Key Moves for Online Interactivity

As we have moved our courses online, we have been compiling tips and strategies to apply the same principles we care about in our classroom teaching (interactivity, inclusion, efficiency and organization) to our teaching on Zoom:

  • Now more than ever it is important for our courses to offer our students a community they can feel like they belong to and can participate in. Our classes should strive to mitigate the isolation we are all feeling as we socially and physically distance ourselves by welcoming students into an intellectual and engaging community.

  • At the same time, teaching through Zoom may make students less willing to participate. Speaking in front of a large group of muted people can be particularly intimidating, in part because we lose some of the social cues from verbal and nonverbal feedback we are used to when we speak up in front of many muted (and sometimes faceless) people.

Here are some ways to increase interactivity and inclusion in your Zoom classroom. You might think of these as the "grammar" for our new "language" of teaching online.

Polling

Just like in our physical classroom spaces, anonymous polling is a great way to hear from all your students, and not just the handful of students most willing to speak up in class. What do your quieter students think? Are they following along, too?

Yes / no and Thumbs up / Thumbs down polls

These are probably the quickest and easiest way to poll your students. (Note: this type of polling is not anonymous, but is very low stakes.) Here's what you need to know:

  1. If your students click on the Participants menu button at the bottom of their Zoom screens, they will see a set of icons they can click on:
    • Raise Hand
    • Yes and No
    • And under the …more button, there is also Thumbs down and Thumbs up.
      Zoom reaction buttons
    • Ask your students questions that can be answered either Yes or No as a quick poll that requires almost no prep time in advance.
  2. You could ask True / False questions, and ask students to respond Yes if they think a statement is true, and No if they think it is false.
    • Try asking students to make predictions using the Thumbs up and Thumbs down buttons (E.g., "Do you expect an output to increase or decrease if we change the conditions of an experiment? Hit Thumbs up if you think it will increase; select Thumbs down if you think it will decrease.")
    • You can also ask to compare two situations using the Thumbs up and Thumbs down buttons
    • Whether asking students a Yes/No or Thumbs up/Thumbs down poll, write explicit instructions on your slide or shared screen telling students what the question is and how to engage when answering.

Multiple choice polling

This type of polling is anonymous, and the instructor has the option of showing the results to the class (or not). Here's what you need to know:

  1. If your class was already using Poll Everywhere or Learning Catalytics, you can continue using these in parallel with Zoom.
  2. Zoom also has a multiple choice polling feature that takes a small amount of prep work and is directly integrated into the Zoom class, making it easy to implement.
    • Go to your harvard.zoom.us page, and select Meetings.​​​​
    • Find the class in which you plan to use a poll, and select it to view its meeting details.
      Screenshot of Zoom website.
    • Scroll to the bottom of the page, and where it says “You have not created any poll yet,” select Add on the right of the screen.
      Screenshot of Zoom website.
    • After clicking Add, you will get the following window in which you can write your Single Choice or Multiple Choice question.
      Screenshot of Zoom website.
    • Hit Save when you are done, and this poll will be ready to send to your students when you start this class Zoom meeting. When teaching your class, locate the Poll button in the menu at the bottom of your screen. (Only the meeting host sees this button.) Clicking this button will allow you to send the multiple choice question to your students.
      Screenshot of Zoom menu bar.

Cold Calling and Warm Calling

Even if you feel reluctant to normally use cold calling, it can be an important way to hear from your students while teaching over Zoom. As always, be transparent with your students, and feel free to tell them that you may start calling on them at random over Zoom because you value their contributions and you know it can be awkward for people to speak up as they normally would in a Zoom class.

One way to hear from more students than just those who are quickest to raise their hands is to ask a question and then give everyone a minute to write down their thinking before you ask for volunteers to share their answers. If no one volunteers, this also makes cold calling less upsetting to the students because at least they’ve all had a minute to gather their thoughts before being called upon

Another way to mitigate the stress of cold calling is to call on a subset of students. For example, unmute five random students whose faces appear on your screen (even when sharing a screen, you can enlarge the window with your students’ faces to include at least five students). Tell your students “OK, on my screen I can see Alex, Jamie, Steve, Jose, and Maria, so I’m going to unmute you five” and then ask your question to these students. This mitigates the stress than at any one student would feel by being put on the spot.

  • To avoid calling on the same five random students every time you do this, you can hit an arrow button in your window of five student faces to cycle through your class to see five different student faces.
Another way to warm call on students is to assign them small group work and break the class into breakout rooms (see below). As the students are working in their small groups, you can enter their rooms to check in on them. When you find a student group that has a correct answer, ask them if they’d be willing to share their thoughts when you return to the main room.

Group Discussions and Breakout Rooms

In situations when students have their mics muted and are unable to see everyone, consider asking them to raise their hands before speaking (using the Raise hand button in Reactions) AND/OR invite them to ask questions via the chat window. You can call on students after they raise their virtual hand or submit their question on chat, and then they can unmute themselves to speak to the class.

  • To encourage participation from more students, you can ask for multiple hands to be raised before calling on anyone. For example, "Before I call on anyone for this question, I'd like to see four hands up," which then allows you to select a student volunteer from whom you haven't heard recently.

Open group discussion with more than 10 students can be a real challenge—there are either too many or too few voices speaking up—so rather than have whole class discussions with a large class, it can be helpful to use Breakout rooms of 4–6 students each anytime you want them to collaborate and discuss something together.

  • When you break students into Breakout rooms, they will no longer be able to all see the same shared screen with an assignment prompt and instructions on it.
  • Instead, post the assignment prompt that you want students to work on either on your Canvas page so students can find it, or send them a link to a Google Doc with instructions for what they should be working on and how they should work on it.

As a host or co-host, you should be able to join and leave all the student Breakout rooms, so you can check in on each group's progress while they are doing small group work. As you do so, you can warm call on student groups that have the correct answer or seem to be on the right track.

Here's how to create your Breakout rooms:

  1. One you hit the "four square" Breakout Rooms button Breakout Room button 
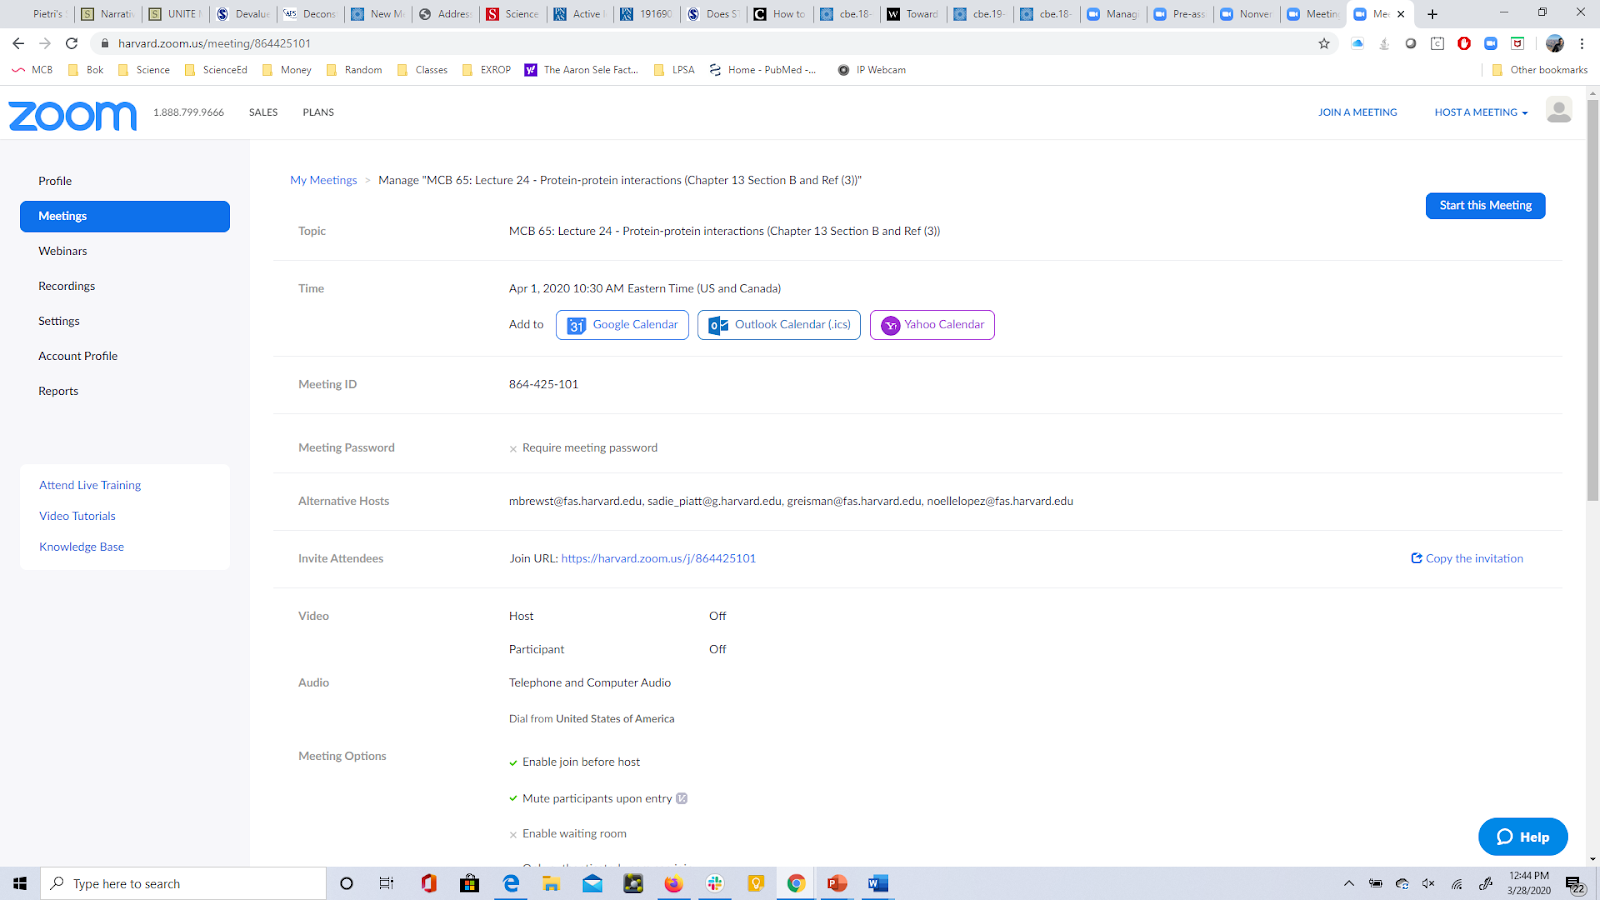
that you have as a host, a window will open that will allow you to select the number of rooms you want to create
    Breakout rooms dialog
  2. This window also gives you the opportunity to randomly assign people to breakout rooms or manually assign people to breakout rooms. You can also pre-assign students to breakout rooms.
  3. Once you choose the number of rooms and select Create Rooms, you get a new window:
    Breakout rooms assignment dialog
  4. Select the Options button at the bottom of this window, which will look like this:
    Breakout rooms option dialog
  5. To make your breakouts move more quickly, you can select “Move all participants into breakout rooms automatically” and you can shorten the Countdown closing breakout rooms to 10 seconds.
  6. It is a good idea to give students in your Breakout rooms rotating roles for their group work. For example:
    • Manager/facilitator: makes sure all voices in the team are heard; makes sure group starts quickly and remains focused during the activity, generally manages time
    • Speaker/presenter: communicates team thoughts, answers, questions, and assumptions to the rest of the class; ensures that all team members have a chance to contribute and that everyone agrees before sharing the team’s thoughts with the rest of the class
    • Reflector/strategy analyst: guides consensus building among the team members; observes team dynamics and behaviors with respect to the learning process; offers suggestions for how the team can work better if they are stuck
    • Recorder: records team names and roles; records important aspects of the group discussion, including observations, insights, questions, assumptions; log important concepts that are discussed
    • Critic/skeptic: politely and collegially asks critical questions skeptical of consensus, such as “how do we know that?” “what evidence, data, or observations could prove this?” “why is this assumption important?” “why are we considering these factors and not these factors?” “what if …?”

For more advice on using Breakout rooms purposefully, see this teaching roundup from The Chronicle of Higher Education.

Other active learning strategies adapted for Zoom

The fact that your course has moved online does not mean that you are precluded from deploying many of the same active learning techniques we discuss elsewhere. Here's how you might adapt them for Zoom.

  1. Brainstorm. Multiple students call out answers to an open-ended, creative, or reflective question for which many potential correct answers exist. Open-ended questions are by definition those which have multiple possible responses, such that inviting answers from a large group can yield more than an expected set of responses.

    • In Zoom, try brainstorms by asking students a question and asking them all to submit their brainstorming via chat.

    • Another approach can be to use gallery view of all your students and do a “whip around,” in which you ask a question that each student needs to answer in sequence. As you go from student to student, getting each student’s answer, students can also “pass” if they don’t have an answer they want to share with everyone at that moment.

  2. Concept map. This activity prompts students to formally describe the relationship between concepts. Typically, students working in groups are provided with a list of terms. They are asked to arrange the terms on paper and draw arrows between related concepts, labeling each arrow to verbally explain the precise relationship between the two terms connected by the arrow. Concept maps are particularly useful to help students make connections between seemingly abstract concepts or concepts learned at different times during the semester.

    • In Zoom, you can ask students to make concept maps by providing them with a list of terms and then breaking the class into breakout rooms. Ask the students in each breakout room to share a whiteboard and collectively make a concept map that describes how all the terms you’ve provided are related. (More than one student can annotate a whiteboard at the same time.) When the students are done, ask them to take a snapshot or a screen capture of their white board, which they can either use to study later and/or submit for credit. (If you ask students to submit their concept maps for credit, ask them to write all their names on the whiteboard with their concept map.)

    • Rather than asking them to make a concept map on a Zoom whiteboard, you can instead ask them to make one using Google Slides, in which they can write the terms in text boxes and draw lines with arrows connecting each term and use text boxes to describe the relationship between the connected terms. (Google Slides may be easier because a group can save their shared slide deck and you can provide them with all the terms in text boxes in advance, so they can just start by arranging them in their slide and drawing arrows between the related concepts.)

  3. Gallery Walk. The instructor writes several different questions or prompts on large pieces of paper at different locations around the room. Groups of students write down responses to a particular question, then rotate to the next question and add responses. At the end of the activity, each group summarizes and shares the responses to their last question.

    • Gallery walks can be adapted to Canvas Discussion Boards. Rather than write multiple questions on different pieces of paper organized around a room, write your questions as Canvas discussion board questions, and ask students to rotate through each discussion question and respond. Ask them to spend 1-2 minutes at each discussion forum before moving to the next.

  4. Graffiti Board. Using pictures, words, or phrases, groups of students respond to prompts that the instructor wrote on large pieces of paper.  Instructor prompts might be to approve or critique an experimental approach or a math proof or to find the error in a computer code. Students might rotate to new “graffiti boards” and contribute additional responses. Provide enough time for students to each rotate to multiple graffiti boards, so that each prompt receives multiple student replies.

    • Similar to gallery walks, graffiti boards can be adapted to Canvas Discussion Boards. Instead of making verbal discussion prompts, you can upload files or images that you want students to respond to rather than responding to a verbal question. Ask students to rotate through each discussion post image and respond. Ask them to spend 1-2 minutes at each discussion forum before moving to the next.

  5. Doing practice problems in small groups. After teaching students about a particular skill or concept, ask them to spend 3-5 minutes working to solve a practice problem, or a question from last year’s problem set, in groups of two-three students. Students can work at their tables or up at blackboards, and you can collect their answers through a multiple-choice poll or by asking for a volunteer to be ready to share the answers from each group. Assigning student roles in a group, such as a reporter, or a skeptic tasked with asking critical questions, and rotating these roles can encourage participation from more students.

    • Breaking students into groups to work on practice problems is easily done in Zoom. Provide students with a worksheet (either a PDF linked to from your Canvas page or by sending them a link to a Google doc that has the instructions and problems they are to work on) and break them into breakout out rooms. See above, but I think break out rooms of 4-6 students work best, and hosts and co-hosts and shuttle between the breakout rooms to monitor student progress and answer questions.

  6. Jigsaw. Small groups of students each discuss different, but related topics. Students are then shuffled such that new groups are comprised of one student from each of the original groups. In these new groups, each student is responsible for sharing key aspects of their original discussion. The second group must synthesize and use all of the ideas from the first set of discussions in order to complete a new or more advanced task.  A nice feature of a jigsaw is that every student in the original group (their “focus group”) must fully understand the key ideas so that they can teach their classmates in the second group (their “task group”).
    Diagram explaining Jigsaw method.

    • Jigsaws can still be done in Zoom using back-to-back Breakout room sessions. You just have to manually design which students are in which rooms for both Breakout room rounds. As students are working together during round 1, you can use that time to identify which students are present in class that day, and figure out how to rearrange the breakout groups so that the Breakout rooms in round 2 have a member from each of the round 1 breakout rooms.

  7. Minute paper, or quick write. All students are asked to spend a minute quietly writing a short answer in response to a question or prompt during class, requiring students to articulate their knowledge or apply it to a new situation. This act of writing itself may even lead students to discover points of confusion or key insights and can help them build the confidence necessary to raise their hands in a subsequent group discussion.

    • The simplest technique we can use while teaching over Zoom. Before asking students to answer a question in front of the whole class, give everyone a minute to collect their thoughts by writing for a minute before asking for volunteers to share their answers with everyone. 

    • One minute papers at the end of class can also be useful, for example through a Google form.   

  8. Responsive lecture. Students work in groups to generate, and rank, questions based on course material (perhaps from lecture, a reading, or an out-of-class activity) for the instructor to answer. Each group submits their questions. After class, the instructor reviews and organizes the questions, and then responds to the top-ranked question at the next class.

    • Students in breakout groups can compile a list of questions in a shared Google doc that the instructor has access to.

    • Ask your students to spend the last minute of class each submitting a question they have to the chat channel (either publicly to everyone, or privately just to you)

  9. Statement correction, or intentional mistakes. The instructor provides statements, readings, proofs, or other material that contains errors. The students are charged with finding and correcting the errors. Concepts that students commonly misunderstand are well suited for this activity.

    • An easily accessible technique in which you can provide students with a statement via a shared screen or a document you place on their Canvas page or as a shared Google doc with a link provided over chat. Ask your students to hit their Yes button if they think the statement is true, and the No button if they think it is false. Ask for volunteers to defend both positions before confirming the answer. 

  10. Strip sequence, or sequence (re)construction. The goal of this activity is for students to order a set of items that have a logical order, such as steps in a biological process, a series of historical events, or logical steps in an argument.  As one strategy, the instructor provides students with a list of items written on strips of paper for the students to sort. An instructor can also leave one step “blank” and require that students fill it in. Removable labels with printed items also work well for this activity.

    • Sequence (re)constructions can be easily adapted to multiple choice questions. Provide students with 4 or 5 labeled steps, and make the choices of the multiple choice question different arrangements of those steps.

Screen sharing and videoconferencing from home

The fact that we are all teaching and learning from home means that we might want to think even more intentionally than usual about how we set up both our electronics and our physical environment to share only what is germane with our students. When sharing screens and video conferencing at home:

  • Consider turning off your notifications. This way nobody needs to see all of your desktop notifications (email, texts, slack messages, etc.) and you get rid of that annoying dinging. (If students are often sharing screens, this could be made a class norm.)

  • Be mindful when sharing your screen of what you are showing. While you can choose what you share when you start screen sharing, in general, it's likely a good idea to resist opening your email or other things that you don’t want students to see.

  • If you are using an iPad or other tablet to do boardwork, make sure that the lock settings are such that it won’t keep going to sleep and making you enter your password every time you take a short break.

  • If your background might distract students—e.g. it is busy, or might reveal something about you which you do not wish to share with students—you might try a virtual background (if your computer supports this feature).